Wednesday, August 28, 2013


Paris is Burning #1, Cracking the Nut

0951, May 18th, 1985. The Soviet Third Shock Army attacks the French 2nd Corps.  The French are stretched thin, but have effective anti-tank weapons with which to engage the Soviets.  Yes, the Soviet tanks can by pass the resistance, but doing so will playce the following echelons at risk.

We played this scenario twice, Chuck was the French 35th Regimant d'Infantry (of course) with close air support from a Super Etendard, while Aaron and I commanding one formation each of the Soviet Juggernaut.  In both games, I had the powerful infantry formation, the 77th Motor Rifle (BTR60-mechanized rifle platoons, with support from the awesome 2S6 Tanguska anti-aircraft vehicle).  Aaron commanded the polyglot 1st Tank in game one and the 8th Guard Tank in game two (a pure T-64 force, with limited artillery support).  This was also the first game using my variant artillery rules.  They seemed to work well.  I've tweaked them a little bit for next time.

The battle takes place on a single map, with the French holding two towns, one at a river crossing.  The Soviets enter and must either control both towns, or exit units from the board, or a combination of both.  In game one, Chuck held the river crossing in strength, leaving only two infantry platoons in the Southern town.  I entered first, threw my infantry into the Southern town and in a rolling tide of assaults, drove Chucks infantry out and killed them as they fled West out of the city.  We controlled the town and exited units easily.  Victory for the USSR!

In game 2, Chuck held the bridge with a small force (one Infantry, one APC and a truck), and massed everything else in the Southern town.  He used his artillery effectively to disrupt my dismounted infantry advance, and Aaron was plagued by two turns in which his Guards didn't activate at all.  I fought my way into the town and across the bridge, but unfortunately left wrecks on the bridge hex and the hex the bridge exited onto.  By the time Aaron's tanks got to the bridge and began pummeling the opposing bank with HE rounds, the finals grains of sand in the clock trickled away.  We didn't have enough time to get our units off the board.  Victory for France!

I sure wished there was some way to clear that fucking wreck off the bridge.  Fighting with vehicles in towns leaves a lot of damage.  Oh, and the Tanguska shot that poor Etendard to bits in both games.  Lethal.

Thursday, August 8, 2013

The Untold Stories #5, Counterattack Countered

June 2nd, 1985. The Canadians are on the counterattack.  Aaron was the East Germans, I was the Canadians.

A very cool little battle.  Two battered Canadian formations (2nd Princess Patricia Canadian Light Infantry and Royal Canadian Dragoons) are attacking across a river.  One equally battered East German Regiment (29th Motor Rifle) is defending the bridge.  Two formations are rushing to its defense:  the massive 53rd Panzer Brigade, led by Hans Wolf himself, and the 116th Aufklarungs.

53rd Panzer is a big formation of T-72's that can activate twice per turn once a Canadian HQ is identified by a Pact recon asset (this never happened during our game).  The 116th is also a 2-activation unit, but it's a recon force without much hitting power.  It's on the map to spot for the 53rd and to call in artillery.

The Canadians have a few platoons of Leopard C1's, which have solid hitting power, but very weak armor (worse than a T-72), two platoons of infantry, a Lynx (recon) and a surprisingly strong little anti-tank asset:  a reduced platoon of M150 (M113 vehicle with a TOW missile launcher on the roof).  It is the only vehicle in the game that can fire through a smoke screen.

The terrain is flat, open fields with a few copses of trees and scattered villages.  Good anti-tank country.  Very exposed.  The East German reinforcements have to make their way over this ground while taking fire from the M150 and Canadian Dragoons.  These managed to kill Wolf and several T-72 units during their approach.  Off-board Canadian artillery also dropped mines onto one of the primary roads, diverting 53rd Panzer for a crucial turn or two.

On turn 6, the Canadians managed to storm across the bridge, into the East German positions before the reinforcements could arrive.

Assessment:  Fast, brutal, battle between weakened forces.  The East Germans have an extremely effective unit:  the 53rd Panzer Brigade.  The problem is that it has to cover a lot of open ground before it can get into the fight, and the unit it's reinforcing is quite weak.  The usual NATO dominance in terms of equipment and activations is significantly less in this battle than in others.  I want to play this again, switching sides.  It's an excellent battle, playable in an hour or so.

Thursday, August 1, 2013

Eisenbach Gap #4: Maelstrom

May 19th, 1985.  Rear echelon forces from 3rd Shock Army are trying to break through a thin U.S. line.  Aaron was the U.S., Chuck and I played the Soviets.

I've solitaired this several times.  It uses the entire map from Eisenbach Gap and features a number of exciting formations:  on the Soviet side the stars is the ever popular 1st Tank and the the 69th Attack Helicopter Regiment.  The U.S. has two balanced formations and the armored Delta Dogs coming in as reinforcements on Turn 2.

Aaron was unfamiliar with the Line of Sight rules, so his initial set-up was flawed (he had his forward units on the "interior" of the hills where their line of sight was blocked).  1st Tank drove into the open center of the board, which looked like a fine decision at the outset, but the situation quickly turned ugly as Chuck's T-72's missed some activations and were cut to pieces.  I advanced through the forest on the right, hoping to cross the river with the aid of my Hinds.  We did manage to wipe out the infantry unit holding the bridge, but by the time we got to the river, Delta's tanks had mauled Chuck sufficiently that they could afford to roll east and catch us in a crossfire.  T-55's burned all along the river road, and those units that survived the crossing were unable to muster the courage to press on to victory.  Aaron won handily.

I always enjoy this battle.  It's big, and the Soviets look impressive on paper.  Pressing into the teeth of dug-in U.S. defenders isn't something to be taken lightly.  Even with the help of Helicopters, I've never seen the Soviets break through.  It's fun to try though.

Saturday, March 23, 2013

Napoleon at Bay, January-March 1814

Played OSG's Napoleon at Bay with Aaron, Chuck and Kurt. Chuck and Kurt were the French.  Aaron was the Army of Silesia and I was the Army of Bohemia.  We played just about in real-time, over the course of several weeks in January-March 2013 (almost the 200th anniversary!).

Aaron and I didn't really coordinate, other than generally keeping an eye on one another, and agreeing that the lessons learned in Germany in 1813 should be adhered to (specifically the one about avoiding battles with the emperor, and advancing when he reveals himself to be SOMEWHERE ELSE).  The opening moves saw Blucher and the to-be-avoided-Napoleon sparring North of Vitry le Francois.  Aaron fended off a half-hearted attack by the emperor (who withdrew along the north bank of the Marne to Chalons-sur-Marne, before disappearing behind a cloud of vedettes).  Meanwhile, I plodded my way Westward, keeping south of the Aube, towards Troyes.  I tried to come to grips with Gerard, who managed to avoid destruction, slipping North over the river toward Sezanne.  The French army concentrated at Sezanne throughout February, grouped roughly in an arc between the Marne and Seine.  Napoleon didn't show himself as Aaron slowly crept West and North and I captured Troyes and pushed a large column under Barclay hard for  Nogent-sur-Seine.  Barclay crossed to the North bank of the Seine in mid-February, where he was discovered by French vedettes (I have to imagine to the Emperor's surprise, given his subsequent reaction).  Within a few days, Napoleon, Murat and the bulk of the French army was at Nogent-sur-Seine and battle was joined.  Barclay withdrew over the Seine (losing enough men to provide Napoleon with a critical victory), and burnt the bridge.

With the knowledge that the French concentration was in the South, Blucher shifted his supply to the North and surged Westward, capturing Reims and Soissons.  The French hovered around the Seine for a few days before resuming their central position screening Paris.  General Wrede's Corps from the Army of Bohemia captured Pont-sur-Yonne, but otherwise the Austrians stalled out, moving their center of operations West to Bray, covering the bridges over the Seine, and advancing with 80,000 men under Schwartzenberg to Sezanne.

Blucher, aware that Napoleon was marching North to confront him, nevertheless kept up his westward momentum, eventually closing on Paris from the Northeast and causing a panic (7+ strength points within 7 movement points of the city).  Napoleon struck Winzengerode, in the van of the Silesian column, on the 5th of March with the bulk of his army. Blucher made a forced-march to support his lieutenant and a pitched battle ensued that saw roughly 16,000 Prussian casualties in its opening rounds (French artillery was lethal, and Chuck committed the Imperial Guard on two attacks).  Aaron showed a lot of nerve, revealing Pitched Battle twice and taking a horrendously one-sided beating.  Fortunately for the Prussian cause, Blucher had a 3-2 advantage in overall numbers and he was able to absorb the losses without breaking.  The second French attack saw Blucher's patience rewarded (Chuck rolled a 6, the only number that could have resulted in a French loss).  With the Guard staked, Napoleon's "pitched" choice switched to a retreat plus a morale loss.  The battle was a critical one, and caused Paris to surrender.  Aaron's Prussians were victorious!  My Austrians could only shake their heads in consternation... they would be facing a resurgent Prussia soon, culminating in 1866.  Napoleon, however, was put on a ship to Elba.  Never to be heard from again (*coughwaterloo*).

This was my first time playing NaB, and it was every bit the treat I had expected.  The Army of Bohemia was perfectly frustrating to play:  large, dangerous but very unwieldy.  The Prussians were hell for the French.  I think that Napoleon has to bloody them right out of the gate, unless the Austrians expose themselves prematurely.  With all the reinforcements the Army of Silesia gets, it cannot be allowed to march unmolested for too long (whereas Schwartzenberg can be allowed to creep along for a while with only token resistance at the Seine bridges).  Chuck and Kurt had a strategy of slowly withdrawing westward, keeping between the Allies and Paris.  That's not a winning strategy.  The Allies have too much power, and can outflank any "line" the French try to establish.  The French have to challenge the Coalition lines of communication, and any force, regardless of size, that reveals itself.  Napoleon can whip any Allied army he meets, almost casually.  He'll need the critical victories to win.

The Campaigns system is a real work of art.  Can't wait to revisit it (though we're off to Leipzig next, returning to OSG's Library of Napoleonic Battles).

Sunday, January 29, 2012

Black Day for the German Army, August 8-9, 1918

Kurt and I played the first day of this fine Pacific Rim classic. Kurt's Entente forces (England, France, Australia, Canada and the 33rd U.S. Division) banged away at my trenches with all they had, until, at the end of the day I was pushed back into my reserve fortifications, with gaping holes in my line, much of it held by regiment-sized speed bumps.

The game is a nice, tight, division level WWI game. I like the way the tanks are represented: they roll over trenches, give an odds shift in battle, and advance at speed, but have to roll a d6 to avoid breaking down every time they move (including during an advance). By the end of the first day, all but 4 of the Allied tanks were destroyed or partially immobilized. I look forward to playing it again. Here's a detail shot of the tip of the German salient, with the Bavarians holding on tenaciously and the British tanks pushing in from the North (right side). The one in orange has been reduced. The german 124's are regiments.

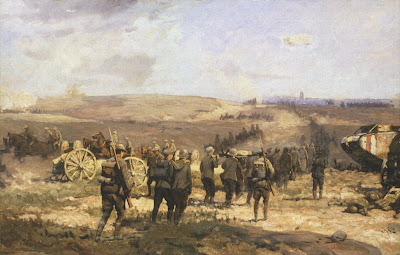
PAINTING: 8th August, 1918 (oil-on-linen, 107 cm x 274 cm, 1918-1919) by Will Longstaff, Australian official war artist. Depicts a scene during the Battle of Amiens. The view is towards the west, looking back towards Amiens. A column of German prisoners of war being led into captivity. Meanwhile horse-drawn artillery are advancing to the east.


Wednesday, September 14, 2011

Death of 1st Panzer #3, Wittman's Ghost

Eric was the Germans, I was the Soviets. Victory depends on the Soviet player controlling both hexes of Wittburg at the end of turn 8.

OPENING: I deployed in Wittburg with my Soviet Paras, hoping to fend off Eric's Panzergrenadiers and Leopard II's long enough for 1st Tank to arrive from the East. He charged his Marders up onto Wittburg Hill while pounding Talen with HE fire from his Leopards. I cut down an infantry platoon that he'd pushed across open ground, but little else.

1st Tank arrived on turn 2, but was hit hard as it broke out of Eben. Three T-72 platoons were disrupted, then burnt up, from Leopard fire at extended range. He caught several more before they were able to get safely behind Wittburg Hill, then blew up a few more with Milans from his Marders as I reached the hilltop. 1st Tank had taken around 50% casualties by this point without firing a shot.

MIDGAME: The T-72's got their revenge, as they overran his infantry and assaulted (and destroyed) his Marders. With the infantry routed, 1st Tank swept down off the hill to take up a defensive position screening Wittburg. They were protected from his Leopards in Talen, but would be able to hit them with opportunity fire if they advanced. The Germans seemed to have no intention of advancing, however, as they cheerfully reduced downtown Wittburg to rubble with High Explosive fire.

ENDGAME: The Germans destroyed everything in Wittburg, and threatened the more of the same to any survivors who ventured back into it. On the final turn of the game, however, I raced my final three platoons from 1st Tank back into town (two of them exploded en route, under his overwatching tanks). When the third "end-turn" chit was pulled, ending the game,I could boast a disrupted BDRM-2 on the hilltop part of town, and a reduced T-72 platoon with 1st Tank's HQ in the lower part of town. Glorious Victory!

RATING: B+ to A. An interesting mix of units. Fast and bloody. The Soviets have a mortar and an odd little AT gun to complement their high-morale paratroopers. 1st Tank, though down to 8 platoons and a BDRM, is a force to be respected. The German Leopards, once again, completely dominate everything else on the board. They are ferocious opponents, rolling 4 dice out to 18 hexes, hitting on 4's. With an HQ, they roll 6 dice. A T-72 saves by rolling 4 dice, looking for 6's. No contest. At 9 hexes, it's even worse, and at 4 hexes, they hit on anything but a 1. That said, there are only 3 Leopards, and 1st Tank gets a designated formation marker, allowing it to activate as many times as the Germans do. In the end, it was a close game, coming down to a final chit-pull (just like the last game with Aaron!).


Test of Fire: July 21, 1861

Played at Uptown with General Kurticus commanding the South and yours truly commanding the North. We used an enlarged map with Battlecry pieces. Very nice looking game. Not a big fan of the pieces that come with the published game, but they're generic so you can substitute almost anything for them. The map and cards are very nice.

PLAY: I plunked a ford down on the Stone Bridge and spent the rest of the game slamming my head into the stone wall of Henry House Hill. In retrospect, it would have been better to have put the ford on one of the river sections beside the bridge, allowing me to get in around him to cut off the hill and allow my boys to cross the bridge in peace. As it was, I was only able to wrap around him very late in the game, and ran out of time.

DESIGN: The defense is very strong, as is appropriate for a Civil War game. I think it's important, as the attacker, to sequence your movements and attacks to stop simple retreats and convert them into kills, otherwise, frontal assaults are more or less useless if your opponant has 3+ men defending. I'm looking forward to playing again, to try to crack the code.